Open-source mobile DevOps #1 - The cross-platform CI/CD
There is no denying that native mobile development is strongly user experience (UX) focused. UX is a complex trade-off between app architecture and User Interface requiring designer,developer, business, client feedback in order to tell the right story to the final user. This reality requires a lots of iterations for creating an app and definitely DevOps is key to answer it. Especially, mobile continuous integration platform could really helps you to stay focus and avoid unnecessary complexity for testing, checking, validating, distributing a mobile application.
Why I choose an Open-source approach ?
First I didn’t wanted to have a black box as CI system in order to mastered this crucial platform for the delivery.
Secondly, mobile tools for testing, retrieve metrics, sign apps … change quickly and perhaps the best way to not be stuck by tools requirements could be to keep control over the hole chain.
Also, I considered at the beginning of the project that all dedicated mobile forge where limited or costs too much for my needs. Now some of them are really mature and it is a good thing to benchmark solutions like Bitrise, Microsoft AppCenter. Those solutions are focusing CI/CD on the cloud fully dedicated to mobile apps.
And finally the Open-source approach completely fits with my current CI ecosystem mainly Gitlab based, most of my company dev tools are open source
Part 1 - The mobile cross-platform CI/CD
Building the solution
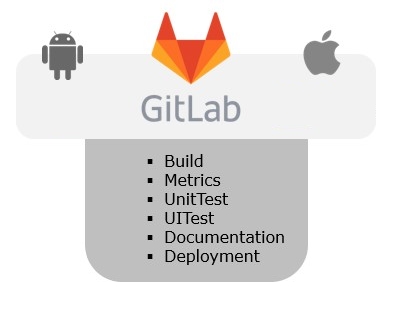
What I wanted for the platform is simply to be able to use gitlab community edition to :
- Commit my code
- Retrieve metrics
- Generate a documentation
- Unit test and test the app on real devices
- Eventually release it on stores if everything was ok
Network and Hardware choices
Gitlab-ci is part of gitlab product bringing CI/CD feature to projects. It is based on Runner used to run your jobs on build machines.
Here is the approach I choose :
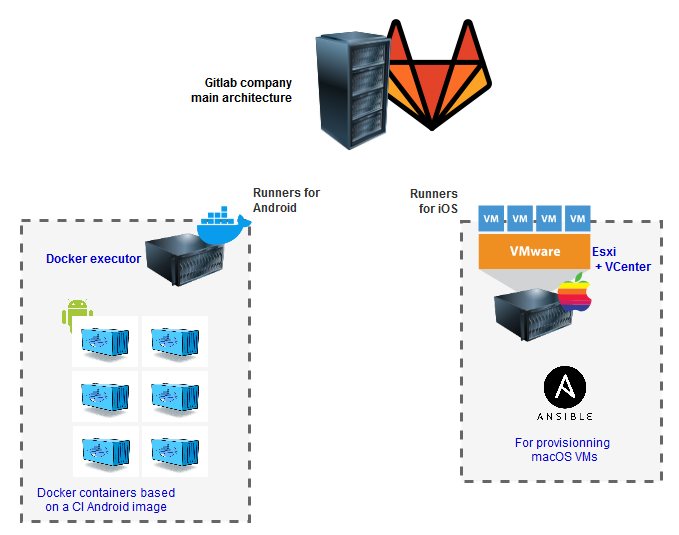
Android support
Because runners support natively Docker, we used an Android SDK image as base that embed all needed tools to build, test, deploy apps… Gitlab-ci will start your docker container based on your image and use it to build. This is possible because Android SDK and most quality tools are compatible with Linux containers.
iOS support
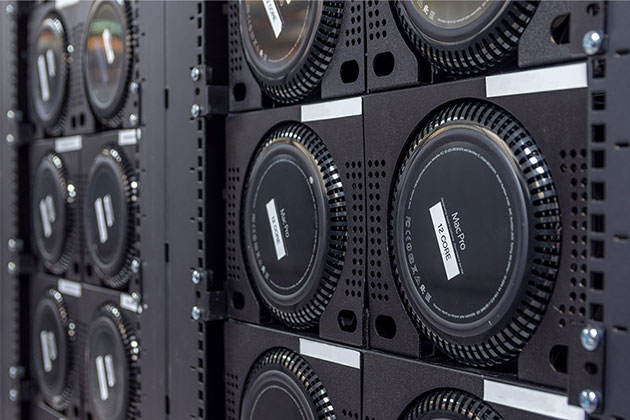
iOS support is a little more tricky. Xcode server exists as a standalone ci server for Apple products. The soft is closed so you can’t connect it properly to an iOS android open platform. Also Xcode tools, the base for building iOS apps, are only macOS compatible. I choose macPro as server with a professional rackmount from Sonnet. To avoid unnecessary complexity for macOS management we put over it VMware ESxi OS that support macOS to be able to create gitlab macOS runners with a flexible deployment. The ESxi is connected to a cluster of the company inside VSphere
Also we simplified tools provisioning of runners. You can use ANSIble to automate the provisioning of macOS runners simplifying Xcodes and tools upgrades.
Configure your Android runner

Create your Docker image to build Android apps
The docker image is the base for create an android CI platform. You can find preconfigured images in docker Hub, here is part of mine :
# Version 2.0.0
FROM centos7

# Install Development Tools needed for NDK and so on
# The current applications available with the CentOS Development tools yum group are:
# bison, byacc, cscope, ctags, cvs, diffstat, doxygen, flex, gcc, gcc-c++, gcc-gfortran, gettext, git, indent, intltool, libtool, patch, patchutils, rcs, redhat-rpm-config, rpm-build, subversion, swig, systemtap
yum -y groupinstall "Development Tools" && \
# Install Development Tools needed for NDK and so on
# The current applications available with the CentOS Development tools yum group are:
# bison, byacc, cscope, ctags, cvs, diffstat, doxygen, flex, gcc, gcc-c++, gcc-gfortran, gettext, git, indent, intltool, libtool, patch, patchutils, rcs, redhat-rpm-config, rpm-build, subversion, swig, systemtap
# RUN yum groups mark convert
yum -y groupinstall "Development Tools" && \
# Install java (OpenJDK)
yum -y install java-1.8.0-openjdk java-1.8.0-openjdk-devel && \
# Install 32bit Library
yum -y install glibc.i686 glibc-devel.i686 zlib-devel.i686 ncurses-devel.i686 libX11-devel.i686 libXrender.i686 zip unzip && \
# Install expect, python-pip and python-wheel
yum -y install libstdc++6:i386 expect python-pip python-wheel which sudo && \
# Clean up
yum clean all

RUN pip install --upgrade pip && pip install requests

# Install Android SDK
ENV JAVA_HOME /usr/lib/jvm/jre-1.8.0-openjdk
RUN cd /usr/local/ && curl -L -O https://dl.google.com/android/repository/sdk-tools-linux-4333796.zip && \
 unzip -qq sdk-tools-linux-4333796.zip -d android-sdk-linux && \
 rm -rf /usr/local/sdk-tools-linux-4333796.zip
RUN yes|/usr/local/android-sdk-linux/tools/bin/sdkmanager --licenses
Run /usr/local/android-sdk-linux/tools/bin/sdkmanager --update
RUN /usr/local/android-sdk-linux/tools/bin/sdkmanager "platform-tools" "platforms;android-28" "platforms;android-27" "platforms;android-26" "platforms;android-25" "build-tools;26.0.2" "build-tools;27.0.3" "build-tools;28.0.3" "extras;google;m2repository" "extras;android;m2repository" "add-ons;addon-google_apis-google-21" "add-ons;addon-google_apis-google-22" "add-ons;addon-google_apis-google-23" "add-ons;addon-google_apis-google-24" 2>&1 >/dev/null

# Install Android NDK
# Source : https://dl.google.com/android/repository/android-ndk-r19c-linux-x86_64.zip
RUN cd /usr/local && curl -L -O https://dl.google.com/android/repository/android-ndk-r19c-linux-x86_64.zip && \
 unzip -o -qq android-ndk-r19c-linux-x86_64.zip && \
 rm -rf /usr/local/android-ndk-r19c-linux-x86_64.zip

# Install Apache-Ant
# Source: https://www.apache.org/dist/ant/binaries/?C=M;O=A
RUN cd /usr/local/ && \
 curl -L -O https://archive.apache.org/dist/ant/binaries/apache-ant-1.10.5-bin.tar.gz && \
 tar xf apache-ant-1.10.5-bin.tar.gz && \
 rm -rf /usr/local/apache-ant-1.10.5-bin.tar.gz

# Install Maven
# Source: https://archive.apache.org/dist/maven/maven-3/3.6.1/binaries/apache-maven-3.6.1-bin.tar.gz
RUN cd /usr/local/ && \
 curl -L -O https://archive.apache.org/dist/maven/maven-3/3.6.1/binaries/apache-maven-3.6.1-bin.tar.gz && \
 tar xf apache-maven-3.6.1-bin.tar.gz && \
 rm -rf /usr/local/apache-maven-3.6.1-bin.tar.gz

# Install Gradle
# Source: https://services.gradle.org/distributions/gradle-4.10-bin.zip
RUN cd /usr/local/bin && \
 curl -L -O https://services.gradle.org/distributions/gradle-4.10-bin.zip && \
  unzip -o -qq gradle-4.10-bin.zip && \
  rm -rf /usr/local/bin/gradle-4.10-bin.zip

# MAVEN CONFIG (Cache support & proxy)
ADD ["./conf/mvn/settings.xml", "/home/www/.m2/settings.xml"]
ADD ["./conf/mvn/settings-security.xml", "/home/www/.m2/settings-security.xml"]


# ENVIRONMENT CONFIG
ENV JAVA_HOME /usr/lib/jvm/jre-1.8.0-openjdk
ENV ANDROID_HOME /usr/local/android-sdk-linux
ENV ANDROID_NDK_HOME /usr/local/android-ndk-r19c
ENV GRADLE_HOME /usr/local/bin/gradle-4.10
ENV GRADLE_USER_HOME=/shared-cache/gradle
ENV GRADLE_OPTS -Dorg.gradle.daemon=false -Dandroid.builder.sdkDownload=true -Dorg.gradle.jvmargs=-Xmx3584M -Dhttp.proxyHost=proxy -Dhttp.proxyPort=3128 -Dhttps.proxyHost=proxy -Dhttps.proxyPort=3128 -Dhttp.nonProxyHosts=\"*.host1.com|*.host2.com\" -Dhttps.nonProxyHosts=\"*.host1.com|*.host2.com\"
ENV MAVEN_HOME /usr/local/apache-maven-3.6.1
ENV M2_HOME=/shared-cache/m2
ENV ANT_HOME /usr/local/apache-ant-1.10.5

# PATH CONFIG
ENV PATH $PATH:$ANDROID_HOME/tools
ENV PATH $PATH:$ANDROID_HOME/platform-tools
ENV PATH $PATH:$GRADLE_HOME/bin
ENV PATH $PATH:$MAVEN_HOME/bin
ENV PATH $PATH:$ANT_HOME/bin

# Check container health by running a command inside the container
HEALTHCHECK CMD /usr/local/android-sdk-linux/tools/bin/sdkmanager
Create a docker executor on your gitlab instance
Configure in /etc/gitlab-runner/config.toml of your gitlab instance
[runners.docker]
  image = "my.registry.tld:5000/namepace/image:tag"
Check GitLab documentation for a more advanced config
Make your first simple build
# image: my.registry.tld:5000/namepace/image:tag # Precise another image than the default one

stages:
    - build

quality :
    stage: build
    tags:
     - docker  # Tag for docker image
    script:
    - sudo chmod 755 gradlew # admin permission
    - ./gradlew assembleDebug
    artifacts:
      paths:
      name: "sample-android-$CI_BUILD_NAME-$(date +%F)"
      expire_in: 1 month   # Uploaded artifacts get deleted after 1 month
Configure your iOS runner

Install ESxi on a macPro
Sonnet website detailed the whole process
The idea is to install the ISO . Remember also to have also a network strategy for providing IPs, data storage (NFS…) for your VMs
Create a VM image on your ESxi
Also since macOS High Sierra, the default filesystem for the OS changed to AFPS (Apple File System). This new filesystem require some VMs properties modifications
To update your VM to boot correctly on VSphere interface go to actions > modify settings > VM options > Advanced > parameter configuration > modify the configuration and add the new parameter below :
efi64.filename efi64_apfs.rom
and then just upload the file here to the root of your VM folder
It will enable AFPS to your VM and so start correctly your new VM.
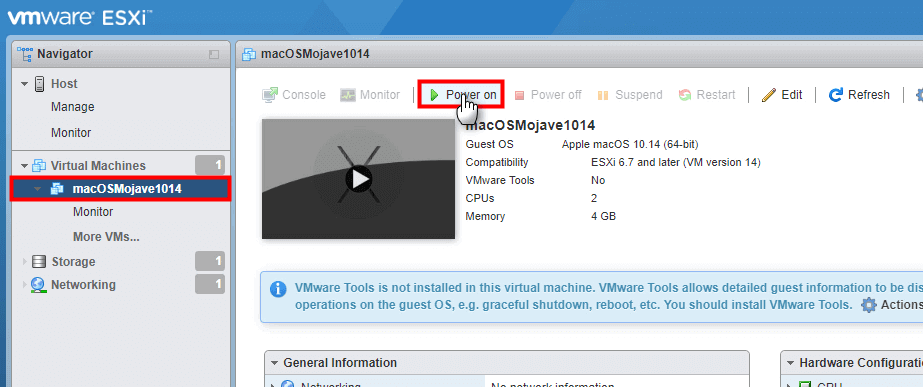
First configuration of your image
Now your macOS image start correctly, this is now the only manual step, you need to follow the macOS startup configuration

Connect your VM to Gitlab as a runner
You can simply use a shell runner executor specifying the IP of your VM . You need to install Gitlab runner on the VM machine.
Create an ANSIble scripts to provisioned Xcode on your remote VMs
...
  vars:
    clean_xcode: yes
    clean_rvm: yes
    clean_homebrew: yes

    configure_xcode: yes
    configure_xcodeserver: yes
    configure_macos_defaults: yes
    configure_ruby_rvm: yes
    configure_homebrew: yes

    xcode_src: Xcode.xip

    xcode_server_user: shashi
    ansible_ssh_user: shashi

    ruby_version: 2.4.0
    rubygems_packages_to_install:
      - bundler
      - xcpretty

    macos_sleep_options:
      - systemsetup -setsleep Never
      - systemsetup -setharddisksleep Never
      - systemsetup -setcomputersleep Never

    macos_animation_options:
      - defaults write NSGlobalDomain NSAutomaticWindowAnimationsEnabled -bool false
      - defaults write NSGlobalDomain NSWindowResizeTime -float 0.001
      - defaults write com.apple.dock expose-animation-duration -int 0
      - defaults write com.apple.dock launchanim -bool false

    macos_software_autoupdates:
      - softwareupdate --schedule off

    homebrew_use_brewfile: true
    homebrew_brewfile_dir: '~'
    homebrew_repo: https://github.com/Homebrew/brew
    homebrew_prefix: /usr/local
    homebrew_install_path: "/Homebrew"
    homebrew_brew_bin_path: /usr/local/bin
    homebrew_upgrade_all_packages: no

    homebrew_installed_packages:
      - autoconf
      - bash-completion
      - git
      - carthage
      - gpg
      - boost
      - cmake
      - ssh-copy-id
      - openssl
      - wget
      - curl

    homebrew_taps:
      - homebrew/core
      - caskroom/cask
      - homebrew/binary
      - homebrew/dupes
      - homebrew/versions

    homebrew_cask_apps:
      - postman
 ...
$ ansible-playbook playbook.yml
Make your first simple build
Add to your iOS app repo certificate deployment script here. It will be used by the CI to deploy your certificate on the VM to build your app
gitlab-ci.yml
stages:
  - build

quality:
  stage: build
  script:
    - ios-certificates.sh $KEYCHAIN_NAME $KEYCHAIN_PASSWORD $CERTIFICATE_PASSWORD $CERTIFICATE_PATH $MOBILEPROVISIONNING_PATH
    - xcodebuild [-project name.xcodeproj] -scheme schemename [[-destination destinationspecifier] ...] [-destination-timeout value] [-configuration configurationname] [-sdk [sdkfullpath | sdkname]] [action ...] [buildsetting=value ...] [-userdefault=value ...]

  variables:
    KEYCHAIN_NAME: "iOS.keychain"
    KEYCHAIN_PASSWORD: "iospkeychain"
    CERTIFICATE_PASSWORD: "iospkeychain"
    CERTIFICATE_PATH: "certificates/development.p12"
    MOBILEPROVISIONNING_PATH: "certificates/development.mobileprovision"

  artifacts:
    paths:
    - build.ipa
    - build.app.dSYM.zip
    name: build
    expire_in: 1 month
  tags:
    - xcode
Result
We have now a mature and industrialized Gitlab platform able to build android and iOS apps. You can specify tags for android, and iOS to your runners to chose on which you need to build for your repo. We just now answer to the build part of our architecture. On another blog post we will add all the steps of quality to analyse, test and deploy your app !
That’s all for today !
The project can be forked here