Open-source mobile DevOps #3 - Deploy your mobile application

What is mobile Devops ? There is no denying that native mobile developement is strongly UX focused. UX is a mix between app architecture choices and user interface choices requirering designer,developer, business, client feedbacks in order to tell the right story to the final user. This reality requires a lots of iterations for creating an app. Definitly a mobile continuous integration platform could realy helps you to stay focus and avoid unescessary complexity for testing, checking, validating, distributing a mobile application.
Why I chose an open source approach ?
First I wanted to master the whole platform and not have a black box as CI system. Mobile tools for OS support, testing, metrics, signature tools… change quickly and the best way to not be stuck by tools requirements is to keep control over the hole chain
Secondly, I considered at the begining of the project that all dedicated mobile forges were limited or cost too much for my needs (2017 research). Perhaps now it would be a good thing to benchmark solutions like Bitrise, Microsoft AppCenter that are focusing on a delivering CI management platform on the cloud fully dedicated to mobile apps.
And finally the open source approach completely fits with my actuals CI ecosystem which are mainly jenkins, gitlab-ci based. Most of my company CI tools are open source.
The global architecture
We will now focus on the quality of your sourcecode and binaries delivery. Mobile ecosystem have thousands of tools that can be integrated into your continuous integration. The idea here is not to integrate everything to your gitlab platform but at least to be aware of tools families and try to integrate at least one example of each.
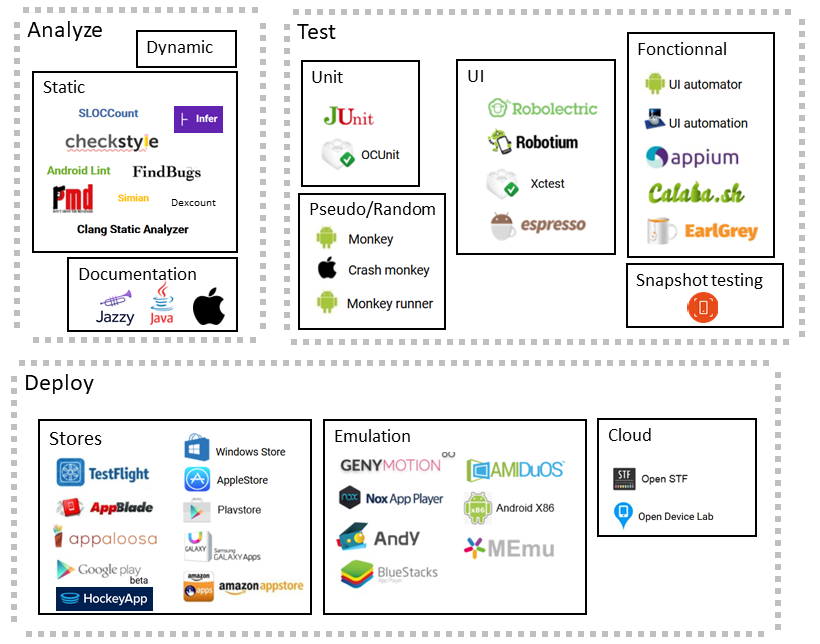
Globally we have 3 main families of tools when we talk about mobile quality :
- Analysing tools : related to bugs searching, functional problems before building and packaging your app
- Testing tools : related to the evaluation of your app or part of your app by simulating real conditions
- Deployment tools : deport your testing part on the cloud or by doing manual testing in real conditions after your app is packaged
Part 3 deploy a mobile application
Deploy for testing on real devices
OpenSTF Architecture
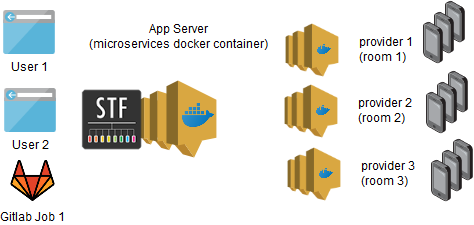
OpenSTF is an open source platform able to control and manage real android devices from your browser or through an API. The project leaded by Simo Kinnunen & Günther Brunner opens the possibility for a company to create its own cloud device platform.


Open STF mainly work with 2 components :
- App server : which is the main server that deploys the web server, database, api
- Provider : it’s an autonomous node for openSTF where you physically plug your USB devices that will serve the global platform
The approach here is to choose a docker-compose to deploy in a convenient way runners on very simple servers such as Raspberry PI.
The docker provider is very convenient if you have devices spread everywhere on the company but brings instead some challenges :
- Providers need to have a linux OS only because only linux will support USB forwarding
- ADB server used by STF is not over HTTP so you will need to specify port range and have firewall rules able to open it
NB : this part of the blog post is inpired by Niko in a very cool medium article available here
Compose your docker architecture for the APP
First you need to create your main “APP” server being able to :
- serve the user interface thanks to nginx
- start the service listening to handle requests
- start the service for authentication of users (it could be mocked, ldap …)
- …
Here is the docker-compose description. You need to fill in it your server IP, LDAP config
docker-compose.yml
volumes:
  rethinkdb:
  storage-temp:

services:
  nginx:
    build: nginx/
    volumes:
      - ./nginx/nginx.conf:/etc/nginx/nginx.conf
    restart: unless-stopped
    ports:
      - 80:80
    depends_on:
      - app
      - auth
      - storage-plugin-apk
      - storage-plugin-image
      - storage-temp
      - websocket
      - api

  app:
    image: openstf/stf:latest
    restart: unless-stopped
    environment:
      - RETHINKDB_PORT_28015_TCP
      - SECRET
    command: stf app --auth-url http://${APP_SERVER_IP}/auth/ldap/ --websocket-url ws://${APP_SERVER_IP}/ --port 3000
    # You can also have a mock authen
    #command: stf app --auth-url http://${APP_SERVER_IP}/auth/mock/ --websocket-url ws://${APP_SERVER_IP}/ --port 3000
    depends_on:
      - rethinkdb
      - auth
      - websocket
  auth:
    image: openstf/stf:latest
    restart: unless-stopped
    environment:
      - SECRET
      - NODE_TLS_REJECT_UNAUTHORIZED=0
    command: stf auth-ldap --port 3000 --app-url http://${APP_SERVER_IP}/  -u ldaps://${LDAP_ADDR}:636/  -t 0  --ldap-bind-dn "uid=..." --ldap-bind-credentials "..." --ldap-search-dn "ou=dpi,ou=pi,ou=ai,ou=Identities,dc=myOrg" --ldap-search-field "uid"
  websocket:
    image: openstf/stf:latest
    restart: unless-stopped
    environment:
      - SECRET
      - RETHINKDB_PORT_28015_TCP
    ports:
      - 3800:3800
    command: stf websocket --port 3000 --storage-url http://${APP_SERVER_IP}/ --connect-sub tcp://triproxy:7150 --connect-push tcp://triproxy:7170
    depends_on:
      - migrate
      - rethinkdb
      - storage-temp
      - triproxy
      - dev-triproxy
  api:
    image: openstf/stf:latest
    restart: unless-stopped
    environment:
      - SECRET
      - RETHINKDB_PORT_28015_TCP
    command: stf api --port 3000 --connect-sub tcp://triproxy:7150 --connect-push tcp://triproxy:7170
    depends_on:
      - migrate
      - rethinkdb
      - triproxy
  storage-plugin-apk:
    image: openstf/stf:latest
    restart: unless-stopped
    command: stf storage-plugin-apk --port 3000 --storage-url http://${APP_SERVER_IP}/
    depends_on:
      - storage-temp
  storage-plugin-image:
    image: openstf/stf:latest
    restart: unless-stopped
    command: stf storage-plugin-image --port 3000 --storage-url http://${APP_SERVER_IP}/
    depends_on:
      - storage-temp

  [...]
.env
APP_SERVER_IP=10.X.X.X
SECRET=openstf
RETHINKDB_PORT_28015_TCP=tcp://rethinkdb:28015
The next part is a little more tricky because you need to declare, on your ngninx configuration, providers informations (IP and name, here it’s “provider1”) so the App server can route correctly request from/to this provider.
nginx.conf
 server {
    listen        80 default_server;
    listen        [::]:80 default_server;
    server_tokens off;
    root          /dev/null;

    #CONFIGURATION FOR PROVIDERS
      location ~ "^/d/provider1/([^/]+)/(?<port>[0-9]{3,5})/$" {
      proxy_pass http://PROVIDER_IP:$port/;
      proxy_http_version 1.1;
      proxy_set_header Upgrade $http_upgrade;
      proxy_set_header Connection $connection_upgrade;
      proxy_set_header X-Forwarded-For $remote_addr;
      proxy_set_header X-Real-IP $remote_addr;
    }
Compose your docker architecture for the provider
Now it’s time to configure your Provider(s). It could be on the same physical server or not depending on the complexity of your clustering architecture. NB you can see that a secret is shared between providers and the app server. Be sure that your are correctly sharing the same on .env file
.env
PROVIDER_IP=10.X.X.X
SECRET=openstf
STATION_NAME=stf
docker-compose.yml
volumes:
  storage-temp:

services:
  provider:
    image: openstf/stf:latest
    restart: unless-stopped
    environment:
      - DEBUG=adb*
    command: stf provider --name ${STATION_NAME} --connect-sub tcp://dev-triproxy:7250 --connect-push tcp://dev-triproxy:7270 --storage-url http://${PROVIDER_IP}/ --public-ip ${PROVIDER_IP} --heartbeat-interval 10000 --screen-ws-url-pattern "ws://${PROVIDER_IP}/d/nuc/<%= serial %>/<%= publicPort %>/" --adb-host adb --min-port 7400 --max-port 7700
    ports:
      - 7400-7700:7400-7700
    depends_on:
      - adb
      - storage-temp
  adb:
    image: sorccu/adb:latest
    restart: unless-stopped
    privileged: true
    volumes:
      - /dev/bus/usb:/dev/bus/usb

  storage-temp:
    build: storage-temp/
    restart: unless-stopped
    volumes:
      - storage-temp:/app/data
    command: stf storage-temp --port 3000 --save-dir /app/data
Deploy it
To deploy it here again it varies depending on the architecture you choose but a simple docker-compose command could do the trick.
docker-compose up
Images for the raspberry runner
If you want to deploy specifically on a raspberry as a server, you can use those images below ready for ARM architecture
Use it on a Gitlab Job
Next step shows the power of a terminal cloud platform. With a simple script embedded on your CI/CD platform like gitlab, you can deploy and test your Android APK built directly on a device by only specifying the desired version of Android.
First step you deploy your python script able to exchange with tje OpenSTF API on your gitlab runner (the script needs to be on the PATH variable). NB : remember to specify the IP of your server on your script
Usages
You can now use STF on gitlab by using the script on your build. You need to specify The token API that you can generate on the GUI of STF. It allows the use of the API. The STF script will only make an ADB connection on your runner to the desired device. After that, you can use spoon to deploy and test your APK and retrieve a report.
.gitlab-ci.yml
testing:
    stage: testing
    script:
    - sudo chmod 755 gradlew
    - ./gradlew assembleDEVDebug
    - ./gradlew assembleDEVDebugAndroidTest
    - android-stf-api.py --token $STF_API_TOKEN --version $ANDROID_VERSION connect
    - adb devices
    - spoon-runner.sh $TEST_APK_PATH $APK_PATH  $TEST_REPORT_PATH
    - adb devices
    after_script:
    - android-stf-api.py --token $STF_API_TOKEN --version $ANDROID_VERSION disconnect
    variables:
      APK_PATH: "app/build/outputs/apk/DEV/debug/app-DEV-debug.apk"
      TEST_APK_PATH: "app/build/outputs/apk/androidTest/DEV/debug/app-DEV-debug-androidTest.apk"
      ANDROID_VERSION: "7.1.2"
      TEST_REPORT_PATH: "tests/*"
    artifacts:
      paths:
      - $TEST_REPORT_PATH
      name: "$CI_BUILD_NAME $(date +%F)"
Spoon runner is also a script utility to simplify usage of spoon on gitlab-ci.yml
spoon-runner.sh
#!/bin/sh
TEST_APK_PATH=$1
APK_PATH=$2
TEST_REPORT_PATH=$3

usage="$(basename "$0") TEST_APK_PATH APK_PATH TEST_REPORT_PATH -- program to launch spoon runner tests on your apks

where:
    TEST_APK_PATH    the path to your test APK
    APK_PATH         the path to your APK
    TEST_REPORT_PATH the path where you want to store your report"

if [ "$#" != 3 ]; then
  echo "Usage: $usage"
  exit 0
fi
echo $TEST_APK_PATH $APK_PATH $TEST_REPORT_PATH

java -jar $SPOON_HOME/spoon-runner-2.0.0.jar $TEST_APK_PATH $APK_PATH --output  $TEST_REPORT_PATH --shard
Now your platform is ready ! Here is the output of tests from the console :
$ android-stf-api.py --token $STF_API_TOKEN --version $ANDROID_VERSION connect
* daemon not running; starting now at tcp:5037
* daemon started successfully

-> Searching for corresponding OpenSTF devices with version 7.1.2...
   SUCCESS: Founded a device corresponding to the android version 7.1.2 with serial 01010101010101

-> Booking the device with serial: 01010101010101
   SUCCESS: Device with serial 01010101010101 is reserved

-> Retrieving device details...
   SUCCESS: details of the device, MANUFACTURER:SAMSUNG - MODEL:Galaxy Nexus - VERSION:7.1.2 - ABI:armeabi-v7a

-> Searching for the ADB connection for the device...
   SUCCESS : ADB remoteConnectUrl is reached (X.X.X.X:7425)

-> Downloading granted adb keys ADB device (X.X.X.X:7425)...
   SUCCESS: Download of adbkey and abkey.pub

-> Connecting to ADB device (X.X.X.X:7425)...
   SUCCESS: Connecting ADB device with address: (X.X.X.X:7425)

$ spoon-runner.sh $TEST_APK_PATH $APK_PATH  $TEST_REPORT_PATH
app/build/outputs/apk/androidTest/DEV/debug/app-DEV-debug-androidTest.apk app/build/outputs/apk/DEV/debug/app-DEV-debug.apk tests/*
2019-01-18 10:43:16 [SR.runTests] Executing instrumentation suite on 1 device(s).
2019-01-18 10:44:17 [SDR.handleFiles] Found class name dirs: []

Running after script...
$ android-stf-api.py --token $STF_API_TOKEN --version $ANDROID_VERSION disconnect

--> Searching for serial numbers of devices used by you from OpenSTF...
   SUCCESS : Founded device linked with serial number: 01010101010101

-> Disconnecting device ADB session from OpenSTF...
   SUCCESS : The device ADB session is removed

-> Unreserved the device by user session...
   SUCCESS : User device is unreserved
You can now simply see the report of tests on your html artifact in gitlab GUI.
Automate store deployment
Distribution of APK on playstore
gradle-play-publisher
You can use for that a Gradle plugin to upload your APK and app details to the Google Play Store. Needs the com.android.application plugin applied. Supports the Android Application Plugin as of version 1.0.0.
Requirements
- Upload the first version of your APK using the web interface.
- Create a Google Play Service Account (see Prerequisites).
- Assign a valid signingConfig to your release build type.
- Add the plugin to your buildscript dependencies (see Usage).
- Apply the plugin (see Usage).
- Apply your credentials inside the play block (see Credentials).
Configuration
In app/build.gradle add class path url to download the
buildscript {
    repositories {
        jcenter()
	}
    dependencies {
        classpath 'com.github.triplet.gradle:play-publisher:1.2.0' //Path plugin gradle
    }
}
Add a dedicated gradle task
apply plugin: 'com.github.triplet.play'   //plugin
playAccountConfigs {
        defaultAccountConfig {
            serviceAccountEmail = 'xxxxx@api-xxxxxx.com'
            pk12File = file('../Google Play Android Developer-xxxxxxxxxxxxxx.p12')
        }
}
play {
    track = 'production' // or 'rollout' or 'beta' or 'alpha'
    userFraction = 0.1  // only necessary for 'rollout', in this case default is 0.1 (10% of the target)
    serviceAccountEmail = 'xxxxx@api-xxxxxx.com'
    pk12File = file('../Google Play Android Developer-xxxxx.p12')
}
The plugin creates the following tasks for you:
| Tasks | Details |
|---|---|
| publishApkRelease | Uploads the APK and the summary of recent changes. |
| publishListingRelease | Uploads the descriptions and images for the Play Store listing. |
| publishRelease | Uploads everything. |
| bootstrapReleasePlayResources | Fetches all existing data from the Play Store to bootstrap the required files and folders. |
You can now use the proper task
script:
    - chmod 755 gradlew # admin permission
    - ./gradlew publishApkPRODRelease # task
Nexus Distribution
We are using the maven plugin in gradle.
apply plugin: 'maven'                                                // maven plugin

def someFile = file("$project.buildDir/outputs/aar/app-PROD-release.aar")            // AAR file path to upload the arr
    artifacts {
        archives someFile
    }
uploadArchives {
        repositories {
            mavenDeployer {
                repository(url: "https://url_of_my_nexus_repo")
                pom.groupId = "com.company.example"
                pom.artifactId = "sample"
                pom.version = '1.0.0-SNAPSHOT'
            }
        }
    }
Then we can call the gradle task newly created
- chmod 755 gradlew
- ./gradlew assemblePRODRelease uploadArchives
That’s all for today !
The project can be forked here.